
BGP Service configuration
Find out how to order and configure BGP Service in vRack Services and set up BGP sessions to announce your public IP blocks with ECMP and fast failover
Objective
BGP Service allows you to build highly available infrastructures by running standard BGP (Border Gateway Protocol) straight from your OVHcloud hosts. Your hosts establish private BGP sessions with OVHcloud routers over your vRack and announce your public IP blocks, either OVHcloud Additional IPs or your own IP addresses imported with Bring Your Own IP (BYOIP).
BGP Service is an option of vRack Services: you order it, configure it and manage it from the BGP Service tab of your selected vRack Services.
This guide explains how to order and configure BGP Service, and how to set up the BGP sessions on your hosts.
BGP Service is currently in Beta and is free of charge during this phase. At general availability, it will be billed at a flat monthly price. Features and limits may change before general availability.
Requirements
- A vRack private network and a vRack Services in one of the available regions. If your vRack Services is not yet linked to a vRack, you can select or create one while ordering BGP Service.
- The servers or instances that will take part in the BGP peering (Bare Metal servers, Hosted Private Cloud VMware on OVHcloud virtual machines or Public Cloud instances), connected to the vRack and directly connected to the subnet you will use for BGP.
- At least one public IP block to announce: an Additional IP block, or your own IP block imported with Bring Your Own IP (BYOIP).
- Knowledge of IP networking, of the BGP routing protocol and of Linux network settings.
How BGP Service works
BGP Service adds Layer 3 routing on top of your vRack Services:
- BGP Service: one per vRack Services, therefore one per region for a given vRack. It holds the ASNs used on both sides of the BGP sessions and the list of public IP blocks you are allowed to announce.
- BGP range: a small block of private addresses (a /28 for IPv4, a /124 for IPv6) carved from a subnet of your vRack Services, therefore used within a vRack private network. It contains the peering IPs used on both ends of the BGP sessions: 4 OVHcloud peering IPs and 1 to 4 customer peering IPs. You configure one BGP range for IPv4 and, if you announce IPv6 blocks, one for IPv6.
- Public IP blocks: the Additional IP or BYOIP blocks that OVHcloud accepts from your BGP sessions. A block that is not on this list cannot be announced.
Each of your peering hosts establishes a BGP session with each of the 4 OVHcloud peering IPs and announces your public IP blocks over these sessions. OVHcloud propagates them to the Internet and, in return, advertises a default route to your hosts. When the same block is announced by several hosts, incoming traffic is distributed between them (ECMP). If a host stops announcing the block, its traffic is rerouted to the remaining hosts within a few seconds (around 4 seconds with BFD: 500 ms interval, 8x multiplier), without any call to the OVHcloud API.
Service capabilities
- One BGP Service per vRack Services: a vRack Services is regional, and a vRack can be linked to only one vRack Services per region.
- Subnet: IPv4 and/or IPv6 subnet of your vRack Services, also used for BGP Service. These subnets must be untagged (no VLAN) and cannot be changed once configured.
- BGP range: defines the part of a customer private subnet used to address the OVHcloud and customer peering hosts (next hops) or Route Servers: /28 for IPv4, /124 for IPv6.
- OVHcloud peering IPs: exactly 4 per IP version, derived from the BGP range.
- Customer peering IPs: 1 to 4 BGP peers (a maximum of 10 next-hop hosts in total) derived from the BGP range. If you need more than 4 BGP peering hosts, deploy Route Servers (see the Advanced BGP configuration use case).
- ASNs: private ASNs only, between 64512 and 65534 for both the customer ASN (64512 by default) and the OVHcloud ASN (65534 by default). The two values must be different. The ASNs are shared by the IPv4 and IPv6 configurations.
- Public IP blocks: up to 50 blocks per IP version, of which up to 32 per IP version can be actively announced at any given time, across all your peers.
- Public IP block sizes:
- Announcement sizes: you can announce a whole public IP block or any subset of it, down to /32 for IPv4 and /64 for IPv6.
- Dedicated IP blocks: a public IP block can be added to only one BGP Service at a time. Only Additional IP blocks that are not associated with any other service (Dedicated Server, Public Cloud instance, etc.) can be selected.
- Routes received: OVHcloud advertises a default route only.
- Bandwidth: 5,000 Mbps per BGP Service.
- Not supported: MD5 authentication of the BGP sessions, public ASNs and anycast announcements. OVHcloud ignores the BGP communities attached to the routes your hosts announce.
- OVHcloud maintenance: before a maintenance on its side, OVHcloud may tag the routes it advertises with the
GRACEFUL_SHUTDOWNcommunity (RFC 8326). - BFD support: Bidirectional Forwarding Detection (BFD) is enabled by default on the OVHcloud side, with fixed settings (500 ms interval, 8x multiplier). To use BFD, configure your hosts to match these values.
Potential use cases
The BGP Service supports a wide range of custom networking architectures; the following examples highlight some of the most frequent implementations:
- Run your own routing stack (FRR/Bird/VMware NSX, etc.) on Bare Metal or virtual routers and establish standard BGP sessions directly with OVHcloud Edges.
- Build high‑availability frontends: use BGP to move IPs between multiple servers (active/active or active/passive) by changing BGP announcements, enabling fast failover actions.
- Set up ECMP / multi-path routing between your hosts and the OVHcloud backbone to increase resilience across multiple servers or VMs.
- Replace the Additional IP failover mechanism: keep the same Additional IP block, but announce it with BGP to fail over in seconds and serve traffic from several hosts at once.
- Design multi-tenant service nodes by replacing L2 proxy-ARP with native L3 routing, where customer IP prefixes are routed through your infrastructure as the next hop.
Instructions
Step 1: Preparing your public IP blocks
You need to either buy an Additional IP block from OVHcloud or import your own IP block with BYOIP. To import your IPs, follow our BYOIP documentation.
The block must be in the same region as your vRack Services.
An Additional IP block used with BGP Service must not be associated with any service (for example a Bare Metal server). Leave it unassigned (in parking): only unassigned blocks are offered when you configure BGP Service.
Step 2: Preparing your vRack and vRack Services
BGP Service runs on a vRack Services, in the region where your hosts are located. If you do not have one yet, create a vRack Services in this region and link it to the vRack that contains your hosts (see our vRack Services guide).
The public IP block does not need to be attached to the vRack: it is announced through the BGP sessions, not through the vRack.
Step 3: Ordering BGP Service
OVHcloud Console Access
- Direct link:
- Navigation path:
Bare Metal Cloud>vRack Services
Select your vRack Services, open the BGP Service tab, then click Order a BGP Service.
On the Order a BGP Service page:
- If your vRack Services is not yet linked to a vRack, select the vRack to use. Only the vRacks that are not already linked to another vRack Services in the same region are offered. To use a new vRack, click
Order a vRack: once the vRack is created, it is selected automatically. - Check the order summary, then click
Continue my orderand complete your order.
Once your BGP Service is delivered, the BGP Service tab shows its information and its status, Draft, until you configure it.
Step 4: Configuring IPv4 for BGP Service
In the BGP Service tab, open IPv4 Configuration and click Configure IPv4.
Fill in the form:
Once you have entered a valid BGP range, the form suggests peering IPs (shown in grey) derived from it. For example, with the BGP range 10.35.0.16/28:
Click Save.
Once the configuration is applied, the Service Status of your BGP Service changes to Ready. If it remains Draft, hover over the information icon next to the status to see what is missing: No BGP range declared or No public IP blocks declared.
Step 5: Configuring IPv6 for BGP Service (optional)
To announce IPv6 blocks, open IPv6 Configuration in the BGP Service tab and click Configure IPv6.
The form is the same as for IPv4, with the following differences:
- The subnet is an IPv6 subnet with private ULA addresses (
fd00::/8), for examplefd00::/64. - The BGP range is a /124 block within this subnet, for example
fd00::10/124. - The public IP blocks are IPv6 /56 blocks.
- The Customer private ASN and OVHcloud private ASN are shared with the IPv4 configuration.
Click Save.
Step 6: Configuring BGP on your hosts
You can now set up the BGP sessions on your side, using the values displayed in the Configuration section of the BGP Service tab:
Each customer peering IP must be configured on a host (or Route Server) directly connected to the BGP subnet.
The following use cases walk you through two typical setups: load balancing with up to 4 hosts, and a setup with Route Servers for up to 10 hosts.
OVHcloud is not responsible for the configuration of the BGP daemon on your hosts. It is your responsibility to configure the BGP daemon on your hosts. The configurations below are examples for your consideration.
Use case: Basic BGP configuration - load balancing using BGP ECMP
This design is suitable for setups with up to 4 BGP peering hosts, as the number of customer peering IPs is limited to 4. If you need more than 4 hosts, use the Advanced BGP configuration using Route Servers use case described below.
Below is a simple architecture that allows you to perform load balancing of your traffic on 3 hosts:
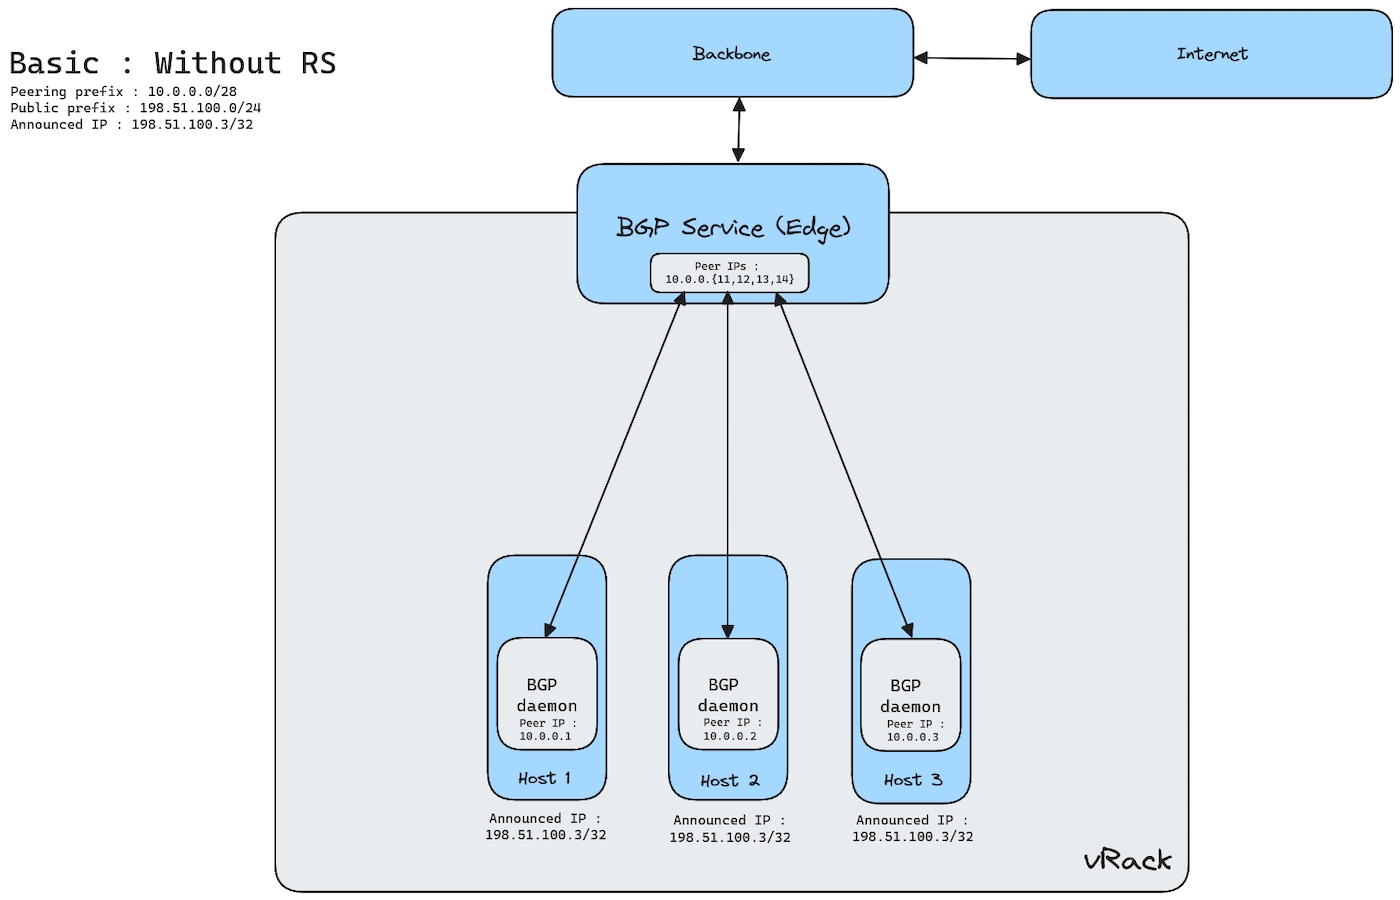
To achieve this setup, you need to install a BGP daemon, like FRR, on each host, and configure it.
Configuration parameters
In your router configuration files, replace the following parameters with the values of your BGP Service configuration.
Configuring a BGP daemon (FRR)
To configure the BGP sessions using FRR, follow these next steps.
Step 1: Install FRR
On a Debian-based system, install FRR with:
Step 2: Configure FRR
All of the following parameters should be present in the /etc/frr/frr.conf configuration file of the hosts.
Prefix list and route map configuration
The configuration below is a suggested setup to prevent any unexpected announcement between BGP peers.
In the following example:
- Hosts only accept default routes from OVHcloud Edges.
- Hosts advertise customer's prefixes to OVHcloud Edges.
Related prefix lists and route maps to filter routes:
BFD configuration
The configuration below is a suggested setup to improve BGP convergence time between Host and Edges over vRack.
BGP configuration
Global configuration:
BGP peering with OVHcloud Edge:
Step 3: Restart FRR
After editing the configuration, restart FRR to apply changes:
Step 4: Verify BGP session
Check the status of your BGP sessions with:
The sessions with the OVHcloud Edges must be in the Established state.
Step 5: Verify ingress and egress connectivity
To ensure your BGP session is functioning correctly, test both inbound and outbound traffic:
- Check ingress traffic
Use a remote server to ping or traceroute to your advertised IP prefix:
Verify that traffic reaches your network via the expected BGP paths.
- Check egress traffic
From your server, check the routing table and ensure your BGP routes are in use:
Confirm that outbound traffic is following the correct BGP paths.
Use case: Advanced BGP configuration using Route Servers (RS)
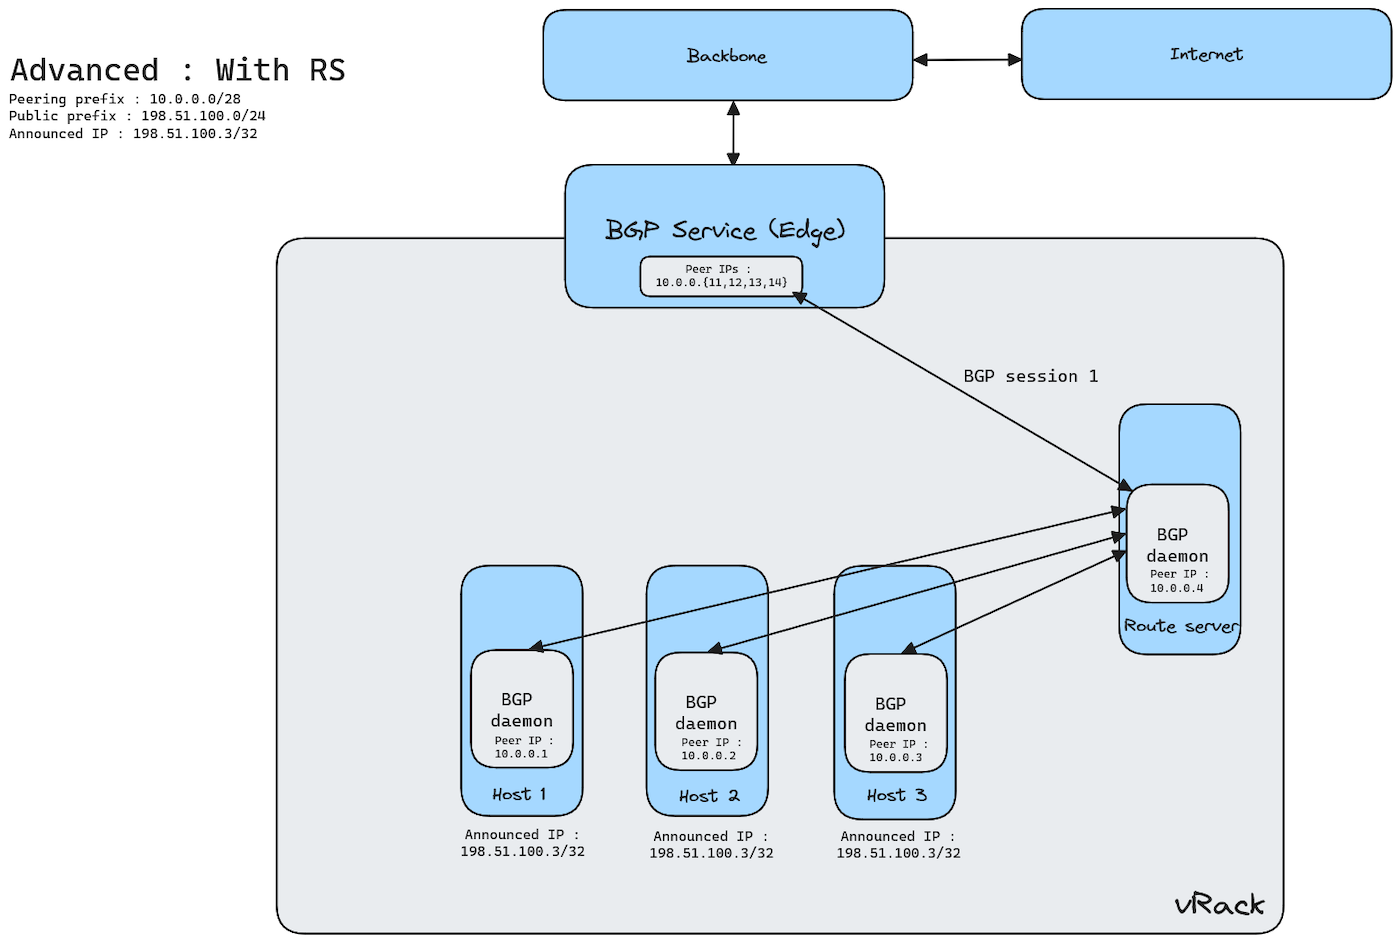
If you want to use more than 4 hosts with BGP Service, you need to deploy and manage Route Servers (RS). This design allows you to scale up to 10 hosts/next hops. Each Route Server uses one of the 4 customer peering IPs, so you can deploy up to 4 Route Servers. The Route Server can be deployed either in-path or out-of-path, depending on your architecture requirements.
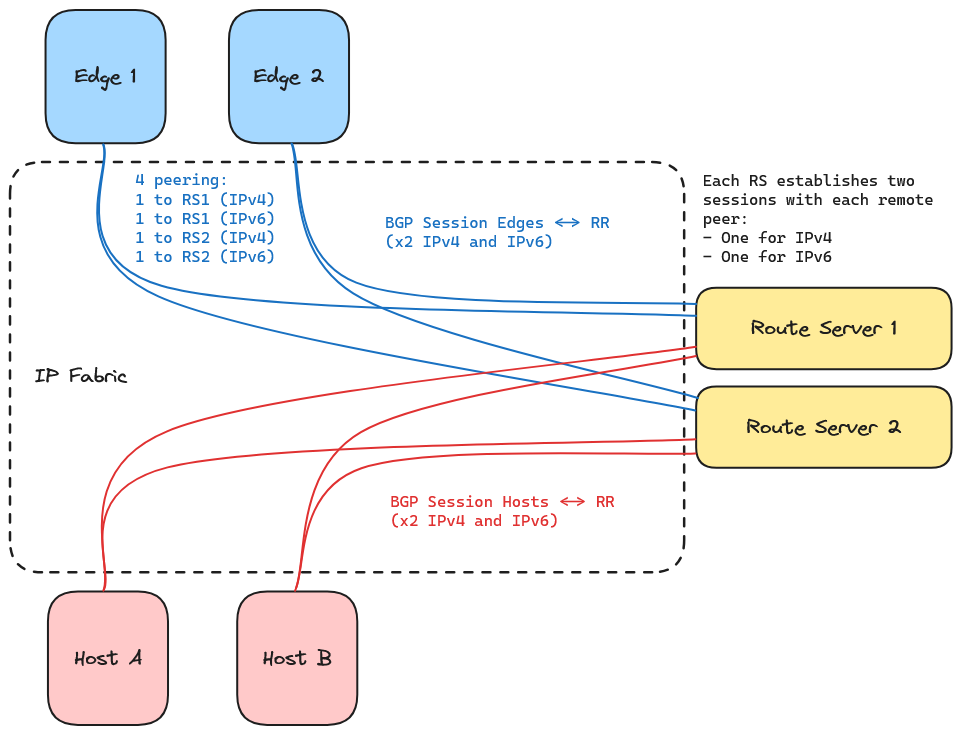
An RS peers with Edges and Hosts, establishing two sessions per peer (one for IPv4 and one for IPv6).
Here is an overview of the system:
And here is a detailed view of the BGP sessions between Edges, RS and Hosts:
To achieve this setup, you need to install a BGP daemon, like FRR, on each host, and configure it.
Configuration parameters
In your router configuration files, replace the following parameters with the values of your BGP Service configuration.
Configuring a BGP daemon (FRR)
To configure the BGP sessions using FRR, follow the steps below.
Step 1: Install FRR
On a Debian-based system, install FRR with:
Step 2: Configure FRR
FRR configuration for Route Servers
All of the following parameters should be present in the /etc/frr/frr.conf configuration file of the route server(s).
Prefix list and route map configuration
The configuration below is a suggested setup to prevent any unexpected announcement between BGP peers.
Route Servers accept default routes from OVHcloud Edges and all routes from Hosts if they match the defined prefix length (see the allowed announcement sizes in the Service capabilities section). Route Servers advertise Hosts' routes to OVHcloud Edges and default routes to Hosts.
Related prefix lists and route maps to filter routes:
BFD configuration
The configuration below is a suggested setup to improve BGP convergence time between RS and edges over vRack.
BGP configuration
Global configuration:
BGP peering with OVHcloud Edges:
BGP peering with Hosts:
FRR configuration for Hosts
All of the following parameters should be present in the /etc/frr/frr.conf configuration file of the hosts.
Prefix list and route map configuration
The configuration below is a suggested setup to prevent any unexpected announcement between BGP peers.
In the following example:
- Hosts only accept default routes from RS.
- Hosts only advertise customer's prefixes to RS.
Related prefix lists and route maps to filter routes:
BFD configuration
The configuration below is a suggested setup to improve BGP convergence time between Hosts and RS over vRack.
The values below are just an example, and you may choose other values for your RS and Hosts.
BGP configuration
Global configuration:
BGP peering with RS:
Step 3: Restart FRR
On each host/RS, after editing the configuration, restart FRR to apply changes:
Step 4: Verify BGP session
Check the status of your BGP sessions on your different hosts/RS with:
The sessions must be in the Established state.
Step 5: Verify ingress and egress connectivity
To ensure your BGP session is functioning correctly, test both inbound and outbound traffic:
- Check ingress traffic
Use a remote server to ping or traceroute to your advertised IP prefix:
Verify that traffic reaches your network via the expected BGP paths.
- Check egress traffic
From your server, check the routing table and ensure your BGP routes are in use:
Confirm that outbound traffic is following the correct BGP paths.
Managing your BGP Service
All the actions below are available in the BGP Service tab of your vRack Services.
Modifying a configuration
In the Configuration section, select IPv4 Configuration or IPv6 Configuration, then click Configure IPv4 (or Configure IPv6).
You can change the BGP range, the ASNs, the peering IPs and the public IP blocks. To remove a public IP block, click the cross on its label. The subnet cannot be changed.
Some changes restart the BGP sessions and may interrupt your traffic:
When you change an ASN or the BGP range, or remove the last public IP block, a banner warns you that the service will restart and lists the affected fields. Plan the changes that restart the BGP sessions during a maintenance window, then click Save.
Renaming your BGP Service
In the Information section, click the pencil icon next to the BGP Service Name, enter the new name, then save.
Terminating your BGP Service
In the Information section, click Terminate BGP Service, then confirm with Terminate.
The service stops at the end of the current billing period: your BGP sessions and prefix announcements are then terminated and the configuration is removed. The same happens if the service is not renewed. A termination cannot be undone. Before terminating, make sure your traffic no longer depends on the announced IP blocks.
Best practices for production
Maintenance of a host without traffic interruption
To take a host out of service for maintenance (e.g. OS update, hardware intervention), withdraw its announcements before stopping it. The OVHcloud peers ignore the communities your hosts send, so tagging the routes with GRACEFUL_SHUTDOWN does not drain the incoming traffic: the host must stop announcing the blocks.
With FRR, shut down all the BGP sessions of the host to be maintained:
The host closes its sessions and its routes are withdrawn: incoming traffic moves to the remaining hosts announcing the same blocks. Withdrawing the routes before stopping the host avoids waiting for the failure detection (around 4 seconds with BFD). This does not mean that sessions (such as TCP) are maintained if they are not synchronized between the hosts announcing the route. Once traffic has moved (verify with the route tables of the other hosts or of the Route Server), proceed with the maintenance.
After the maintenance, re-enable the sessions:
The host re-establishes its sessions, announces its blocks again and starts receiving traffic.
Available regions
The product is available in the following regions:
3-AZ regions and regions located in the US or APAC will be available at a later date.
Troubleshooting
If you encounter issues with your BGP Service:
- The status remains Draft: hover over the information icon next to the status to see the reason. No BGP range declared means the configuration is incomplete; No public IP blocks declared means that no public IP block is selected.
- A public IP block is not offered in the list: check that the block is in the same region as your vRack Services, that it is not associated with another service and that it is not already used by another BGP Service.
- A BGP session does not reach the
Establishedstate: check that the host uses one of the customer peering IPs, that it is directly connected to the BGP subnet, and that the ASNs configured on the host match the Customer private ASN and OVHcloud private ASN values. - Your prefix is not reachable from the Internet: check that it belongs to one of your public IP blocks, that its size is allowed, and that there are no conflicting announcements.
- Ensure your firewall and network policies allow BGP traffic (TCP port 179) and, if you use it, BFD (UDP ports 3784 and 3785).
If the issue persists, create a support request in our Help Centre.
Go further
Exposing a managed service on your vRack with vRack Services
Join our community of users.